how to take care of your nails
nail care is one of those things i'm passionate about, so i figured i'd make a tutorial on how to take care of your nails, prevent injuries, and grow them out if that's something you're interested in!
part 00: thoughts and supplies
things to consider:
- time is necessary to see improvements and growth. there's not much more to this lol, it's just a fact we have to accept. there is no magical miracle way to make your nails grow an inch in 24 hours. it takes time, and the time it takes nails to grow can vary from person to person. the average is around 3mm a month, but it can be slower - or faster! - than that. no matter what, acknowledge it's probably gonna take a little while to get your nails where you want them so you don't frustrate yourself trying to rush something impossible
- genetics are a factor. how soft or brittle your nails are, how fast they grow, how long your nail beds are, how strong your c-curve is, etc. are all determined by genetics. sometimes these things can be improved with vitamins or changes in health, but often these things can't really be changed. you've gotta make peace with what you have, and care for your nails accordingly. speaking of…
- what you have determines what you need. for example, someone with naturally brittle nails would need to focus more on flexibility, while someone with with really thin nails may need hardeners, etc.
- yellow nails aren't necessarily bad. if they're yellow towards the tips but normal near the cuticle, then it's likely just staining. sometimes the color of natural nails can indicate health problems, so if you're noticing your nails are yellow or darker across the entire nail plate including the cuticle, it may be beneficial to consult a doctor
- match length to lifestyle. it might not be a good idea for a volleyball player or a gardener to have long stiletto nails. the more nail = the more opportunity to break them when you're using your hands. do you engage in sexual activity with your fingers? this might sound like a joke, but the fact of the matter is longer nails aren't good to fingerbang with. basically, choose a length for your nails that doesn't hinder your lifestyle, or if you're really determined to have long nails, lifestyle changes may be necessary
necessary supplies:
- a nail file
- a base coat
- cotton balls
- a moisturizer
- nail polish remover
- rubbing alcohol
- a cuticle pusher
part 01: avoid damage and injury
keeping your nails healthy and avoiding injury are the main goals of nail care. even if you have other goals, like length, these are still the foundation. when i say “injury,” of course i mean it in the classic sense… but i'm also referring to breaks. because breakage is considered a “vanity concern,” i don't often see it addressed that breakage is still damage being done to your body, and often times breakage can have gnarly consequences aside from just aesthetic effect. i've drawn blood with rips, lads ): so cared for nails = nails less prone to being injured
- be cautious with using your hands. (especially your fingers.) use tools to open packages, use your knuckles to press things like buttons or open things like cabinets, etc.
- no naked nails. wear at least a base coat at all times. having a layer of polish can help reinforce the strength of the nail, and help reduce them getting saturated with liquids. speaking of…
- avoid getting nails wet. water saturates the nail, making it wider, flatter, and therefore weaker. as with skin, when you get nails wet, the applied liquid can actually end up drying out the nail plate more as well. wear gloves when doing dishes to help reduce this
- moisturize nails. okay, this might sound counterproductive to the last point, but hear me out. you want your nails to have some flex to them, so that they're more likely to bend instead of break or rip. while water can be damaging, oils and creams provide a healthy moisture
- (maybe) avoid nail hardeners. they make nails more brittle, because they make them, well… harder :,) i have very thin, weak nails, that rip instead of break. using a nail hardener i found caused the opposite problem where my nail would break and chip. for some people, hardeners may be beneficial, so it may be worth a shot, but if you find you get a lot of breaks a nail hardener might actually be the culprit (o i o)
- file in one direction. if you saw back and forth over the free edge of the nail with a file, it can actually cause micro-fraying, which can lead to peeling and weakness. the sawing motion also puts a lot of pressure and stress on the nail, which can cause tears and breaks
- don't buff nails. i see this as a tip constantly and uhhhhh. it's not a good idea lmao. buffing the nails literally removes the top layers of nail, which are the strongest layers, and ultimately make your nail plate thinner. thinner = weaker = more prone to breaking and ripping ):
- avoid acetone (for the most part.) acetone is very drying to nails, and can therefore damage them
- work in a ventilated area. when using polish and removers, they have a lot of fumes. they're chemicals after all. nail techs often wear masks to keep from being overwhelmed with fumes, so that could also help, but if possible ventilate the area you're working in in general
- DO NOT CUT LIVING TISSUE AROUND THE NAILS*. ie, don't “cut cuticles." i know this is a point of debate lol… but cutting the cuticles can result in bacteria entering the skin of the finger, resulting in infection. if you want a personal horror story, i used to be a nail biter, and i would chew the skin around my nail. i once got such a bad infection i had to go see a doctor, and he had to do an emergency surgery to lance and drain the infection, and remove part of my nail plate that was also infected. he swore that if i'd waited one more day to seek treatment, he would have had to send me to the er for emergency amputation instead. my finger swelled up to twice it's size, and turned green, purple, and black. infections in this area are no joke
* i want to note that caring for cuticles, and even removing some of them safely isn't the same thing as cutting into living tissue. i'll discuss this more in the manicure section, but i also thought it was important to note in the injury section to just… don't cut yourself on purpose :,)
part 02: basic manicures
when people think of a "manicure,” they probably think of going to a salon and having a tech paint your nails. that's… not entirely wrong :,) here i say “basic” because there are basic steps to a manicure that are beneficial to everyone, whether you intend to paint your nails or not
- do your manicure step by step. would it make sense to apply a colored polish then trim your nails? that's a waste of product, and can cause chipping and flaking. it's important to do the steps of a manicure in the proper order
step 01: remove old nail polish (preferably with acetone-free nail polish remover)
step 02: gently push back the cuticles with an orange stick or rubber tip. you can use a cuticle softener/remover gel to help make the job easier. these products make the cuticle softer, similar to how the skin gets in water, without the water part. (although right after bathing is a prime time to push your cuticles back as well!) pushing them back helps keep the nail plate even, so when you apply polish you won't have a ridge. it can also look nicer, and be more comfortable so you don't have any snags. reminder, DO NOT “CUT YOUR CUTICLES”*
* you can trim your cuticles. as i mentioned before, cutting live tissue is dangerous. a lot of the problem with this is a lot of people might be confused about what the “cuticle” actually is. i made a point of putting “cut your cuticles” in quotations because that's how other people refer to it, and unfortunately they often mean cutting your eponychium or nail fold, not cuticles. i've also made a point of saying not to cut live tissue. the actual cuticle is dead tissue. eponychium = live tissue, not the cuticle. nail fold = live tissue, not the cuticle. cuticle = dead tissue, not the eponychium or nail fold
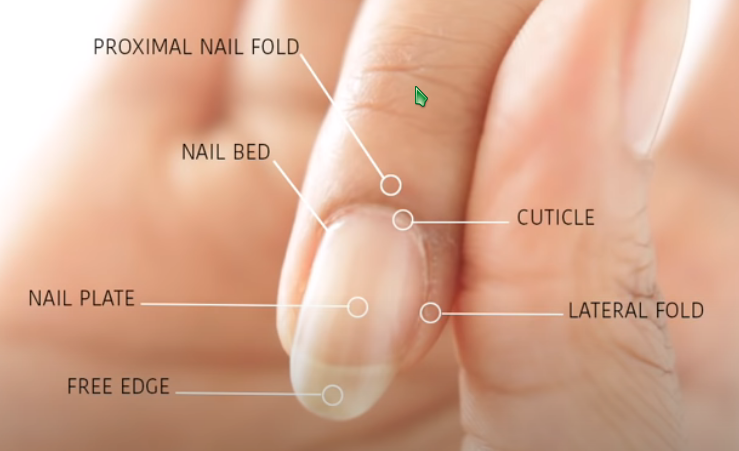
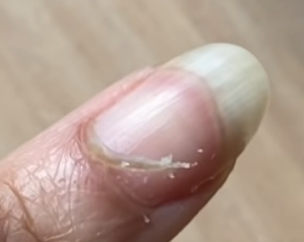
usually just pushing the cuticle back with a softener/remover will be sufficient, but sometimes you might have overgrowth of dead stuff. the dead stuff is safe to remove, so long as you leave the live tissue alone. i've included a picture of an example of overgrown dead tissue, and someone removing it. a general rule of thumb is live tissue is opaque to slightly translucent and soft, while dead tissue is whiter and hard
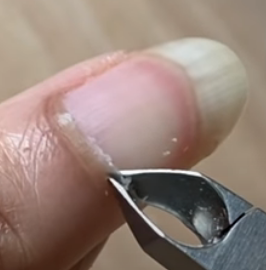
if you're going to trim dead tissue, it's better to use a nipper, not a shaver. you have more control with a nipper and are less likely to cut deeper than intended on accident
step 03: (cut and) file the nails. this step is to get the nails to the length you'd prefer them to be, and help smooth any snags that might be on the free edge. you can do this entirely with a file, but you can also use nail scissors to trim and then file if you're removing a lot of length. clippers aren't recommended because they can be more damaging
step 04: dry the nails. using a dehydrator product is ideal, but a light swipe of 99% alcohol applied with a cotton ball can also help remove natural oils from the nail plate. while it's good to keep your nails moisturized, when you're applying products it's better to work on a clean, dry surface, so that the product will actually adhere to the nail
optional: apply treatments, such as a strengthener or hardener. a strengthener's goal is to nourish the nails to make them... well, stronger :,) a hardener's goal is to... well, harden the nails :,) a side effect of a hardener can be brittleness, so bear in mind what your nails would need. these treatments are often considered base coats, but i find they and base coats have separate benefits and have had no problems wearing both
step 05: apply some type of base coat along and under the free edge of the nail, "wrapping" it. this will help prevent chipping and staining. this is in line with "no naked nails" from the previous section. once the nail is wrapped, apply the base coat all over the nail and let it dry
there's various types of base coats to consider! you can also layer them, but it may be best to weigh the pros and cons so you don't have a ton of layers. but if you need multiple benefits, layering is an option
- a bonder primarily focuses on helping polish adhere to the nail and stay put, preventing chips
- a ridge filler will fill in all the grooves in the nail, giving an even surface to apply polish to, providing a smooth finish
- an anti-yellow base coat is intended to protect the nail from staining and discoloration
- a combination base/top coat is intended to be used as both but... i don't recommend it. i'm just addressing that it's a type you'll encounter. i find the combinations, in trying to do two things, ultimately fail at both. it's better to have dedicated and separate base and top coats. the only time i'd recommend a combination base/top coat is if you don't intend to use polish and just want to avoid naked nails
part 03: applying lacquer
here's what most people think of when they hear "manicure" lol. this section is about painting your nails, aka the fun part!
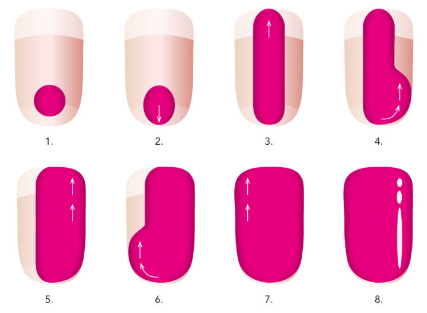
step 01: wrap the color on the free edge and partially under the nail. this will help seal it and prevent chipping. we're doing this first so that when the polish is applied to the nail bed, it will cover what's on the free edge, and mask the little bump
step 02: apply the first coat of polish on the nail bed. use thin coats of polish. thick coats take longer to dry, and can come out uneven and gloopy. this can also flood the cuticle, which is not what we want. thin layers that dry completely are also a lot less likely to flake and peel
start in the middle of the nail, near the cuticle (but not at the cuticle.) set the brush on the nail, and push it up a little bit, as close as you can get to the cuticle without flooding it. then drag the brush down the middle of the nail. do another two swipes down the sides
allow this coat to completely dry
optional: apply more coats of nail polish if you want or find it necessary. again, make the layers thin and let them dry completely. most lacquers need at least two coats to be opaque. if you need a third coat, do it but maybe consider if that polish is worth it or would work better as a topper :,)
optional: apply a topper if you want one. toppers are sheer and add some sort of effect, such as adding a tint or glitter
step 03: wrap the tip and under the nail with top coat
step 04: apply top coat to the nail bed
now your nails should be a pretty color, and hopefully the color will hold up :)
part 04: other color methods
lacquer isn't the only way to color your nails! these products are also fairly accessible, available at most retailers!
- gel: gel polish can last a lot longer and is less prone to chipping than lacquer. gel polish requires an led light to cure. application is the same as lacquer, except instead of allowing it to air dry, you put your fingers under the lamp to let them cure usually within in seconds. this method can be quicker, and more durable, but the tradeoff is the products can be more expensive, you need the initial investment of the led lamp, and using acetone to remove it is most effective
- dip powder: dips are even more durable than gel. application requires applying a base coat, and dipping the nail in pigmented powder, and allowing it to dry. once dry, remove the excess powder, then recoat and redip is necessary. cons are it can be gritty and clumpy, so a lot of buffing is required, and this method also requires acetone for removal, but... if you're only applying acetone once every three weeks, dips might balance out
i personally primarily stick to regular polish*, so i won't be going over how to use these other methods in-depth, but they may be worth a shot to see if they're to your preference! there's a ton of guides out there on how to use these products
* sometimes i'll paint my nails as usual, then go over them with a gel top coat and cure it for extra longevity. i actually like changing my polish once a week, and because this method can actually make a color last longer than that, i don't do it too often simply because it does take a lot of time to remove if i want to switch it up lol. but tl;dr a regular polish + gel top coat is an option if you want a cheaper way to make a mani last
part 05: acrylics and falsies
these aren't recommended for extended wear, because frankly they're very damaging ): it's also difficult to grow your natural nails and care for them because they're covered up. ngl i love both but [clenches fist with tears in my eyes like a shounen anime protagonist] i gotta let 'em go
- acrylics: these are another thing most people think of when they think of going to a salon for a manicure. this is legit acrylic applied on top of the nail, and shaped to whatever you want. pros are they're durable and take polish well, and they look damn good... but cons are they require a lot of upkeep (fills every two weeks), are expensive (kits or salons), require buffing, and are damaging to the natural nail (especially with prolonged use). i recommend them for special occasions when you want your mani looking ace (such as a wedding, or photoshoot) or if you have a rip/break that needs an extension or to be held together. removal requires a nail drill, and/or a lot of acetone
- falsies: ye olde glue ons lol. these can also look dope, less expensive than acrylics, and come in various lengths and shapes. but the cons are nail glue in itself is incredibly damaging, they require buffing for long wear, they're not as durable as acrylics, and when they rip off on accident they can damage your nail plate. to get these off you can apply acetone to basically melt them, or on the bright side you can more safely remove them by soaking your hands in water mixed with oil. soaking still isn't good for the natural nail, but... it is better than a ton of acetone or ripping them off. i personally use these to mask if i have a break and a nail that's significantly shorter than my other nails, or to hold a bad break together
disclaimer: there's also polygel as an option, but... i'm not familiar with that product and have never used it, so i don't think i'm really qualified to give a statement on it
part 06: healthy moisture
moisturize the hands, cuticles, and nails with a cream, butter, and/or oil. (but honestly? using all three doesn't hurt lmao.) do this numerous times a day. even if you don't do anything else in this guide, please do this. this is what's gonna make your hands look clean and smooth, what's gonna give your nails more durability and flexibility, and will nourish your skin. what i personally do is apply oil, and massage my fingers and let it soak in. then i put cream over that, because it's lighter and also soaks in. then i put butter over that to really lock the moisture in
if your hands are exposed to water, immediately follow up with a product to lock in moisture so hopefully damage will be minimized. i find a cream suffices for these situations
i personally keep numerous moisturizers around in various places so i have access to them. i keep my stuff on my desk right by where i work and hang out so it'll be right by me, and i can apply moisture while i'm talking on the phone or watching youtube or whatever. i also keep a butter on my night stand next to my bed to apply before i go to sleep, a cream by the sink so i can apply after i wash my hands, and a cream in my purse to apply throughout the day while i'm out bc hand sanitizer is a priority but drying :,)
the best oils are jojoba, which is closest to the body's sebum so it gets absorbed well, vitamin e for strength and hydration, and tea tree which helps lifting/separation, and is antibacterial. note: tea tree oil needs a carrier oil, ie a few drops added to a whole bottle of another oil is fine :,) for vitamin e, while i think pure oil is easier, you can also get digestible tablets and poke a hole in them and squeeze the oil out
your options aren't limited to these tho, it's just based on my obsessive extensive research. i find these the Top Three most beneficial oils. i highly recommend at least using these three oils, but you can always add some more too! other oils that wouldn't hurt are argan, coconut, grapeseed, rosehip, sunflower seed, sweet almond, and other scented oils (chamomile, lavender, rose, etc. these also follow the carrier rule and only a few drops should be used however.) you can also just put your mix in a travel bottle, or nifty twist pens. there's also, of course, pre-made cuticle oils out there that wouldn't hurt
a really cheap way to seal in moisturizer and oil is to also apply vaseline on top. does it feel slimy? yeah. is it good for your nails? hell yeah. you can also get a pair of cotton gloves and wear them after applying moisturizers at night. cotton is breathable, so not as hot, and it allows your skin to breathe while keeping the moisturizers on them. (you can do this with socks for pedicures too and if you want soft tootsies lol)
seriously moisturizing is so important it gets it's own part lol
part 07: supply storage and care
- sanitize your tools. nails harbor a ton of bacteria, so disinfecting tools you've used on your nails before means you won't be reintroducing bacteria to your hands and nails, reducing risk of infection. wiping your tools with alcohol should suffice. if you wash them with soap and water, make sure they're completely dry. metal tools can rust, and if they're stored without being dry they can also keep the container they're stored in moist, allowing whatever bacteria may have survived the washing process to grow
- store polishes mindfully. don't place your polishes and remover near a heat source. they are flammable :,) this includes keeping your polishes out of direct sunlight. the best place to keep them is in a cool spot without sun exposure. light and heat can affect the formula, and change the color, or make the formula less effective. it's also best to keep bottles in an upright position to avoid possible spills and separating
- don't shake your nail polish bottles. this mixes air into the polish, and can cause tiny bubbles. these bubbles can even be transferred onto your nails, meaning your manicure won't last as long. gently roll the bottle between your palms instead,or wait at least 20 minutes before use if you absolutely had to shake the bottle
- check if products aren't expired and still work. you don't want to use dull scissors, or gloopy polish from 2004
- keep everything (relatively) together. i guess this is optional, or even a "duh," but... i'm the kind of person who used to have orange sticks in the bathroom, a polish on my desk, cuticle remover in a random drawer... :,) i've changed my habits and now i keep my supplies together in designated spots, depending on how much i use them. for things i use frequently, i keep them near where i spend the most time, and i store other supplies i don't use as often in a designated drawer. before doing a manicure i get all my products out for ease of use as well
- keep track of polish with swatches. this is also optional, but i highly recommend it. if you have a lot of colors, this will help you keep track of what looks like what. i find sticks are better than wheels, so they can be labeled. another thing i love to do with this is keep track of combos i've found on them. i just print out brands and names with a label maker and slap it on the stick, but writing directly on them with permanent marker works too
part 08: product recommendations
these are just recommendations for stuff i currently use or have in the past. if i were a youtuber i'd make an empties and rebuy video lol. i know i'm a bougie libra with particular taste, so you can likely find a cheaper alternative with some looking. however, things marked with a  are my personal holy grails i recommend above any other product
- base coats: china glaze strong adhesion, orly bonder
- brushes: beetles nail art set
- butters: lush lemony flutter, bert's bees lemon butter, cuccio
- cuticle nipper: decute
- cuticle pushers: 100 ct orange sticks, 6 ct reusable rubber tips
- cuticle remover: sally hansen
- hand cream: gold bond healing hand cream, bath and body works strawberry pound cake
- glass file: xipoo glass nail files
- nail strengtheners: l.a. girl calcium nail builder, hard as hoof, opi nail envy
- oils (diy): jojoba, tea tree, vitamin e, mango, twist pens
- oils (premixed): cuccio, opi pro spa, sally hansen
- polish removers: ella+mia soy non-acetone, mineral fusion non-acetone, onyx professional acetone, 30 ct remover clips, pump dispenser
- ridge filler: opi ridge filler
- storage: 6 ct acrylic wall shelves, acrylic riser, carrying case, 3 tier rotating rack
- swatching: treamlyn clear swatch sticks, kyzistn swatch rings
- top coats: essie gel setter, out the door, seche vite

