
Step Two: Take the first string on the left (represented with F) and bend it over the next string (R) so that it looks like a "4." Continue to pull it around the next string (R), and up through the space between. Keep pulling up and tighten it to make a knot.

Step Three: Repeat Step Two. No matter what style bracelet you are making, ALWAYS DOUBLE KNOT.

Step Four: The first thread (F) should now be the second in the row, to the right of the thread you wrapped it around. The new first thread (R) needs to be pulled to the left so it's out of the way. Repeat Steps One through Three using (F), but this time wrap it around the thread to the right of it, represented with (I).
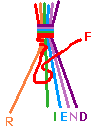
Step Five: Repeat all previous steps across all the threads in the row until you have a line.

Step Six: Each time you finish a row, start a new one with the thread from the left. Lather, rinse, and repeat all the steps until the bracelet is as long as you like. Tie a knot at the end and snip the end threads to a proper length, and it's ready!

Extra: One thing you can do to add some spice is tie beads to the ends of your tying threads. They clink and are so cute in both sound and appearance, although they could get annoying. Keep in mind there are multiple styles of bracelets, and the one portrayed here is only the most basic "Candy Stripe."